Friday, 27 July 2012

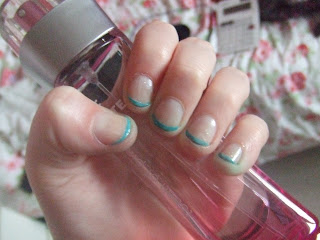
Another Zooey Deschanel inspired manicure..

Well basically, these are a french manicure nail but instead of white tips I designed them with turquoise tips as I had seen them done by Zooey Deschanel.

Things you may need:

* Nail polish remover
* Natural french manicure pink
* Turquoise nail polish this one is Collection 2000
* Clear nail polish
* Possibly nail guidelines

METHOD:

1. Start by making a turquoise tip, either free hand or using the guidelines,

2. Once this is complete paint 1-2 layers of pale pink, but make them very thin layers! As you still want to see the turquoise,

3. When all the polish is dry paint a top coat of clear nail polish over your nails to make the design more hard wearing.

Hope you like them! I'll start posting more again now it's the summer holidays!! :D


Monday, 16 July 2012

Yellow nails....

I decided to do something different than most people and paint my nails yellow! It's quite a lemony yellow that I bought but it isn't very good quality :( It peels off after the first day and stains my nails yellow after use.

Basically, these were pretty simple, paint two coats of yellow and then paint white flowers on the sides of your nails so only half of the flower is painted with a thin brush (liquid eyeliner brushes also work well. And dot the centre of your flower in any chosen colour you wish using a dotting tool or the end of a hair pin.

*TIP* Remember to have a cotton pad with nail polish remover on hand as you can use this to clean the thin brush used for the flowers in order to make sure the brush is not clogged up.

Finish with a top coat of clear to seal the design in and hopefully help it to last longer than mine did!!

Overall, I can kind of see why people don't use yellow nail polish often, but I loved the colour and thought it went well with my summery outfits for work experience.

Sunday, 15 July 2012

Nautical Striped Nails..

Well these nails were pretty simple to do and I managed to do them free hand! Basically, all you need is 1 blue nail polish, 1 white nail polish, 1 clear nail polish and one thin, long brush for the lines (you could use a liquid eye liner brush for this.) The method is pretty simple to do as are most of my nail arts....
1. Paint the base coat blue (in any shade of blue you have), some may need two coats to make sure you achieve a more solid colour.

2. Then dip your thin brush into the white polish after the base coats have dried, and try as neatly as possibly to create a long thin line on your nails with your thin brush

*TIP* Have a cotton pad with nail polish remover near you, so you can wipe excess nail polish and clean your thin brush to make painting straight lines easier

3. Once the stripes have dried, top them with clear nail varnish to limit chipping and therefore getting longer out of your design.

Saturday, 14 July 2012

Tuxedo Nail Art..

These looked much better in person than they do in the picture, but I'll give you a quick idea of how to do them...


1. Using white nail polish paint a base coat onto your nails

2. Once the base coat has dried, using a black polish paint the tips of your nails with a thin brush

3. To do the bow tie, paint an X on to your nails and then fill in the gaps of the X to create a bow shape

4. Using either a dotting tool or the end of a hair pin, dot 3 small dots under the bow tie for the buttons on the shirt

So there we have it, it's very simple and easy and would look much better on longer nails but they are growingg slowly! I copied the design off Zooey Deschanel, because she is my style crush! I have also done another nail art inspired by her for you to have a go at.

Love love loving the tuxedo inspired nails as they are so quirky and individual, why don't you have a go?!

Sunday, 8 July 2012

Star Cupcakes!

I've been baking again now I have some free time ! They were so easy and simple to make and the recipe was by far the best cupcake recipe I have found:

Ingredients:
  • 100g butter or margarine
  • 150g caster sugar
  • 150g self raising flour
  • 2 large eggs
  • 3 tbsp milk
  • 1/2 tsp vanilla essence
Method:
  1. Preheat the oven to 180c/160c fan/Gas 4. Line a muffin tin with paper cases.
  2. Mix all the ingredients together into a smooth, even batter.
  3. Divide the mixture between the cake cases, filling each one to about 2/3 full.
  4. Bake for 25 minutes or until golden and firm to the touch.
  5. Cool on a wire rack before icing.
The decoration of the cakes was so easy !  I bought so ready to roll white icing from my local ASDA, so you could find it in any supermarket. I also bought some lilac ready to roll icing from my local cake craft shop, you may also need some pink and blue food colouring.
1) Spread a thin layer of jam on the top of your cupcake to act as a glue for the icing,
2) Roll the icing out on a surface sprinkled lightly with icing sugar to stop it from sticking to the surface. Roll it until about 0.3cm thickness
3) Using a cookie cutter around the same size as the top of the cupcake and smooth it over with your fingers until no cake can be seen
4) Add food colouring to a section of the ready to roll icing and mix well until the whole icing is the same colour to limit marbling.
5) When the icing is at 0.3cm thickness using a small cookie cutter of any shape you wish
6) Repeat cutting these shapes out and spreading a tiny bit of jam on the back again to act as a glue, and place them randomly on top of the cake

They taste exactly like birthday cake! It's great, and they look very pretty as well, they're also practise for if you want to make a larger fondant iced cake as they use the same techniques. You can buy cookie cutters off eBay or amazon in various different shapes and sizes to perfect the design on your cake.

Monday, 2 July 2012

Flower Print Nails....


At this point, my nails had grown slightly, plus I was going to a party and thought I'd do my nails funky to be slightly more individual. My dress was black and my shoes purple, so I painted my nails red and this is the reason for the red dots on the flowers (plus I don't have a yellow).

For the base coat I used a lovely peachy orange colour as I thought this would allow the flowers to pop and again I didn't have a vast enough nail polish collection to own a natural colour.


1. Apply a neutral shade under coat
2. Wait for this to dry then apply a second layer if necessary
3. After this layer has dried, using a small paint brush a white nail polish attempt the paint flowers onto your nails by placing a blob of polish and then spreading it with the brush.
4. Repeat this in a random pattern along your nails if the flowers are different sizes it doesn't matter they'll look good in the end
5.On each flower either using a dotting tool or the end of a hair pin, dab a blob of nail polish in any colour or in red like mine
6. Then use a a top coat to seil the design onto the nail

TIP: have a cotton pad with nail polish remover on it to clean your brush and stop it from becoming clogged up making it difficult to create the design

I like to do simple designs for people to create who have only just got into nail art,
similar to me but don't know how to start.Any questions, don't hesitate to ask,
Happy Nail Arting!