Saturday, 30 June 2012

Easy Polka Dot Nail Art (My first ever!)

So, here on the right--------------------------------------------------->
are the nail polishes I used to create my polka dot nail design. I used a mint green Barry M base coat, and then a Barry M pink for the dots. I'm also very short on ALL nail polishes so the only clear I had contained glitter :( But it helps to give a funky look but needs some elbow grease to get off!! I'll give you a step by step guide on how to create these nails below:
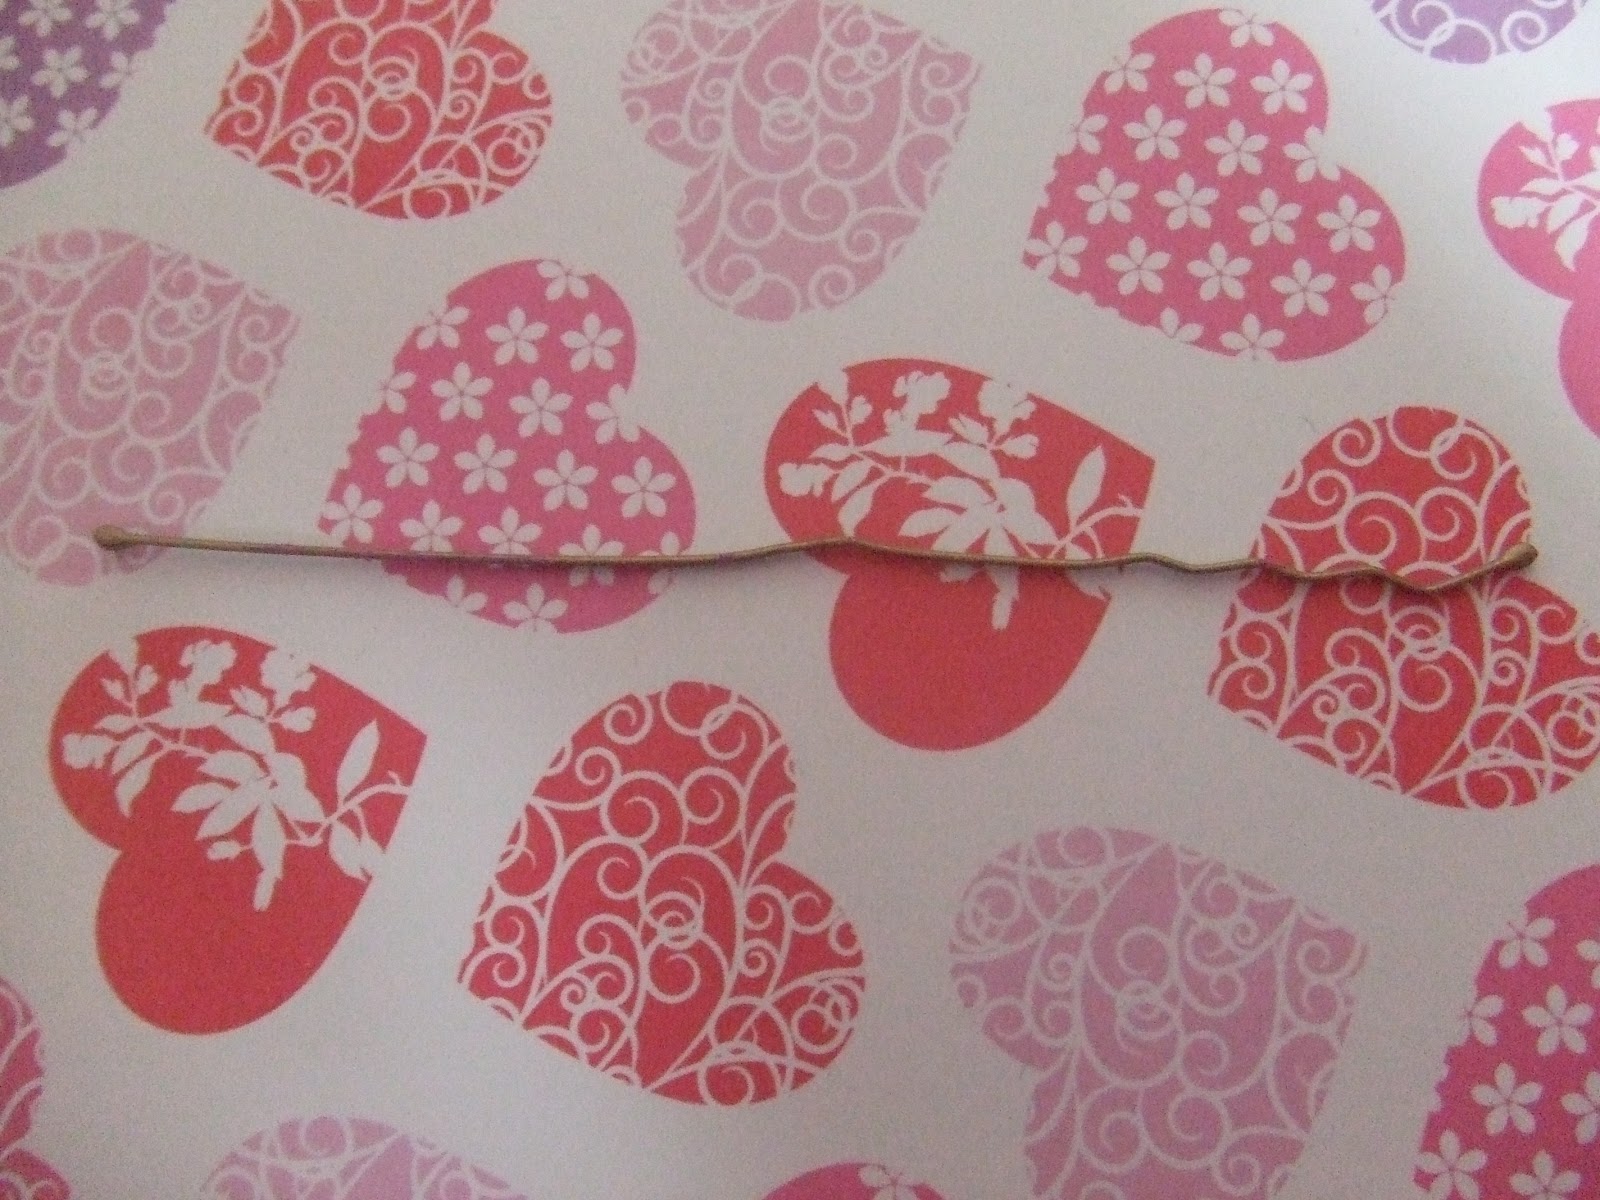
1. First apply your chosen base coat (in my case, this is MINT green), put about two coats of this on to make sure you create a bold base colour..... 2. Then I bent a clip like this here: -------------> and dabbed it into the pink nail polish (enough to coat the tip that isn't bent without is looking too empty, but not too much, or your polka dots will come out huge and mishaped) also at this point make sure you have a cotton pad to hand with nail polish remover on it to remove any excess polish on the tip of the hair pin.             
3. Dab random dots across the entire nail until you are happy with the design
4. Wait until the nails are dry and apply a top coat of clear nail polish (with or without glitter)


Your nails should be complete! These are so quick and easy I do them everynow and again as a quick design when I'm feeling lazy and don't want to spend hours on one design!


As you guys can tell my nails are back to their natural length, so this design is useful for short nails as they do not need a large nail to do polka dot designs. I'll be posting some more nail designs that I've done over the last couple of weeks soon as I've got the blogging bug againnn!


If you do have a go at polka dot print nails please send me a picture of yours or if you have any queries don't hesitate to ask me anything ! :-)


Friday, 15 June 2012

Chocolate Chip Cookies!


So I made these chocolate chip cookies yesterday, they have white and milk chocolate chips in them..
They're not too difficult to make and the mixture made about 20 cookies

INGREDIENTS:
125g of SR Flour
125g of Plain Flour
1 Full Egg
1 Egg Yolk
1 tbsp Vanilla Essence
170g Melted Butter/Margarine
100g Caster Sugar
200g Brown Sugar/Demerara Sugar
You're own amount of chocolate chips, I'd recommend anything from 150g to 325g

METHOD:

1. Pre-heat oven to 170c/gas mark 3, grease baking trays with butter or line them with baking parchment
2. Sift the 2 separate flours out into a separate bowl to the one you are mixing in
3. Melt the butter/margarine with the two sugars until well blended
4. Then add the vanilla essence, egg and egg yolks...until light and creamy
5. Then mix in the flour until the mixture is well blended together then stir in your selected amount of chocolate chips
6. Drop about a heaped tablespoon of cookie mixture onto the baking tray around 8cm apart (doesn't really matter if they blend together, they're supposed to look rustic)
7. Do not flatten the dough! Bake them in the oven for 15-17minutes or until the edges are lightly toasted
8. Leave to cool on the tray until relatively cool and transfer them to a wire rack or any other surface to allow them to cool

They should keep for about a week, but are best ate sooner rather than later ! :D

Hope you have a go at making these cookies and let me know what you think of the recipe. They don't have baking powder/soda because I didn't have any in the cupboard, but the SR flour added to the plain flour helps to counteract the absence of the baking powder so isn't missed.


Thursday, 7 June 2012

Being all patriotic for the Queen's Diamond Jubilee and made a cake...


I know it's a little late, but I still thought I'd post my Union Jack cake for you all to have a go at next time there is a Royal/British/Olympic occasion. It's basically a Victoria sponge cake (carrying on with the monarchy theme), I'll write the recipe and method below, but it's pretty simple really.


INGREDIENTS:
250g - Caster sugar
250g - SR Flour
250g - Butter/Margarine
1 tbsp - Vanilla essence
4 - large eggs


METHOD for making the cake: pre-heat the oven to 180c

1. Cream the caster sugar and margarine together until fluffy
2. Add the vanilla essence and half the eggs and sieve in half of the flour and then mix together
3. Add the remaining eggs and flour into the mixing bowl, until the mixture is creamy with no lumps
4. Grease the tins with margarine and tin foil or line your tins with grease proof paper
5. If you have 2 circular baking tins then pour an equal amount of the mixture into each tin. If you don't have 2, fill one half way and then once cooked re-fill with the remaining mixture
5. Place the baking tins into the oven and cook at 18c for 20ish minutes or until golden brown
6. Remove from the oven and allow to cool before decorating

It's a pretty simple cake to make really and it should be nice and light and fluffy when you come to eat it later. I'm now going to tell you how I decorated the cake.

INGREDIENTS:
Raspberry Jam
Raspberries
Blueberries
Butter cream:
1 tbsp of milk
115g margarine/butter
50g icing sugar


METHOD: decorating the cake
1. Once the cakes come out of the oven, they may have a slightly raised top, trip the excess off the top of the cake to allow the cake to balance properly.
2. For the bottom layer keep the trimmed side of the cake facing upwards and spread a layer of raspberry jam onto it
3. For the top layer, spread a layer of jam onto the trimmed side of the cake and then place this side of the cake downwards (so the top of the cake should be the bottom of the cake when it comes out of the cake tin). This might seem confusing but it should make the cake look prettier
4. Then mix the milk, margarine and icing sugar together until the butter cream is well mixed and relatively thin with no lumps of icing sugar
5. Using a palette knife (or any other flat kitchen utencil) smooth the buttercream onto the top of the cake (you should have just enough to cover the whole top of the cake with a thick layer)
6. Then cut the raspberries in half to make it easier to place on the cake
7. The rest is pretty self explanatory, try using your blueberries and raspberries to create a Uninon Jack pattern (basically a cross with two diagonal lines for the raspberries, and fill the gaps with triangles of blueberries).


Hope all you people who read the blog that are from Britain had a great Jubilee weekend but also, if you are reading from another country, have a go at this cake anyway but use various different fruits to create your countries flag! :-) If you have a go at making this cake or have any questions about how to achieve it, don't hesitate to ask me a question !

Tuesday, 29 May 2012

Denim Jackets..

 So by now, you should have all realised that once I find a style of clothes I like, I buy like 10 of them but in various styles e.g. the shorts the midi skirts...well yeah I bought a jacket similar to this from a shop in England called Internationale. It's quite cheap in their and I bought a jacket  for £17, it has pockets as well so I can keep my keys and stuff in there which is handy. This jacket on the right ----------->
is from Debenhams, around £25-£30. I like colour of this denim jacket as it can be put with anything in your wardrobe. I also like the rolled up sleeves, it makes it a bit more stylish and edgy.


But I'll admit, my new love is coloured denim jackets. I recently bought a lilac jacket from Dorothy Perkins for £30, yes, it does seem overpriced but I've certainly had my wear out of this jacket already and it isn't even summer yet! So I found a nice alternative colour red ----------------------------->
This again is from Debenhams, but I thought it was a lovely colour as the high street don't often have many red's in their fashion ranges. I'd wear this with a pretty summer dress or a 
t-shirt & shorts/skirt.

But I didn't stop there with the denim jackets, I also bought this green one from red herring in Debenhams. I'd like to justify this buy, as it was in the sale for £16, so yeah it couldn't be left on the shelf. I love the pastel colour of this jacket and the short sleeves, which make it more summery. This jacket does go with quite a few colours however...be aware of what colours you do put with it or you might get a major clash ! I wear mine with blue tea dresses, tights and dolly shoes or over a pretty dress and sandals in summer :)

I hope you guys have been converted to denim jacket lovers, I wear mine all the time, so much so my friends have ago at me for it. I think they are so versatile and can be worn with anything. They are also helpful for cold mornings or evenings when the cold air hits your shoulders. There are loads of choices online or in store for you to choose from. These are only a few and only from Debenhams, get searching! :)


Farm Animal Cupcakes..Well Pig cupackes

So I've not posted in yonksss due to my exams etc. They're all done now *insert bbm dancing face*, thank god! So i thought I'd give you a post a wrote weeks ago but never got round to publishing...

Well since the baking disaster a few weeks ago I decided to make pig decorated cupcakes. Although I'm not planning on eating them, I'm sending them to my mums work for her to sell to the staff for charity...I don't think I could deal with the amount of calories I'd end up consuming after one ! Well basically I'll give you a step by step of my pig cupcakes.

1. I made some basic vanilla cupcakes and the ingredients I used are below:
100g SR Flour
100g Caster Sugar
100g Butter/Margarine
2 Eggs
Tea Spoon of Vanilla Extract

Here is a step by step guide on how to make them: Gas Mark 180 for 15-20 minutes or until golden brown

1. Cream the margarine and caster sugar together with either a fork or electric whisk
2. Add the vanilla extract, eggs and sieve in the SR flour to make it light and fluffy
3. Then mix together with a fork or electric whisk until the mixture is light all mixed in
4. Then fill the cupcake cases up until about half way..this recipe should make 11/12 depending on how much you fill each case with
5. Then place then in the oven until golden brown

2. Once the cupcakes are baked leave to cool until they are cold enough to ice, otherwise the icing will slide off

3. To make the butter cream for the top of the cakes the ingredients are below:
175g of Icing Sugar
75g of butter
1tbsp of milk

The method is below:
1. Mix with a fork the icing sugar, butter and milk together or use an electric whisk however be prepared for the icing sugar to go everywhere!
2. Once the mixture is relatively runny and there are no lumps of icing sugar add gradually drops of the pink food colouring until you get to the desired pink
3. Make sure you mix thoroughly to have all the butter cream the same colour

4. Have 2 bowls one with marshmallows and one with milk chocolate drops

5. With a palette knife or any other knife scrape the butter cream until you have an even coating, you can then take the case off and smooth the edges to a round shape

6. Then cut the marshmallows in half with the top of the marshmallow pointing upwards to create the ears, apply butter cream onto the back of them and stick them to the side of the cake

7. Lay the marshmallows on their side and cut down the centre to create a round shape, this will then be the nose and should be placed on the cake

8. Two chocolate drops should be used for the eyes and then two more with butter cream underneath need to be attached to the marshmallow nose

9. Then repeat all these steps to create your own pig cupcakes


Monday, 7 May 2012

Newspaper Print Nails...

After sitting in college one day and noticing that loads of people had newspaper print nails I wondered, how do they do it? Well you can find out here as I attempt it on my newlyish gel nails (as seen in previous posts) so I can make the most of my usually short nails and practise this funky technique on them!

First I chose a lovely pastel green colour to paint my nails with as a lighter colour will allow the newspaper print to stand out more. This nail polish is Barry M "Mint" and I got it from boots for around £3. First do a coat of clear, then one or two coats of the colour of your choice.

Next you need a bowl of warm water, and 10 pieces of newspaper print roughly double the size of your nail.

Then you dunk one piece of paper into the bowl and place it on your nail. Be careful not to move it around too much or it'll smudge. Then hold it on your nail for around 2-5 mins with lots of pressure to get a darker transfer. Then peel it off and give a top coat of clear to seal the newspaper print in. Then continue on the rest of your nails, once dry you can then remove any excess ink on your fingers with the water in the bowl. Oh and if you make a mistake, just dunk your finger in the bowl rub the ink off and start again.
Here are my finished nails. I used Avon clear nail polish with a hint of gold to do mine but any clear will do. Hope you have fun doing your nails! If you have any problems just message me. Oh and if you do your nails like this, I'd love it if you sent me your pictures! :)

Sunday, 6 May 2012

The Battle Of The Midi Skirt...

I've not posted in a while, and I'm not sure if anyone is actually reading this but it's the battle of the midi skirt. They seem to be this seasons latest trend so I thought I'd give you the low down on some of my favourites :-)


Obviously I'm going to give you my favourite first as in the one I bought to wear in the summer..

Well yeah, this one above in the tiny picture is a pleated bright green midi skirt I recently bought from New Look for £20.00. It was then in the sale for £6 so was pretty annoyed that I payed the price I did! The skirt is a lovely length and looks good with heels like in the picture and also a pretty pair of sandals. I'm planning on wearing mine with a slogan vest tucked in and a denim jacket. This is the vest I bought from New Look for £10 to wear with it, it's ticking the patriotic trend in the UK this year due to the Jubilee and the Olympics with the slogan "London calling." I love this vest and also wear it will jeans, converse and a cardigan/blazer.


Another favourite midi skirt of mine is this lovely pale pink skirt with a tan belt...

This skirt is also from New Look for around £20. I love this skirt as it is ticking the pastel shade trend box. It is also less dressy than the green one above as the material is more flowing. I think the tan belt gives an added twist to this look and also enhances the waist I would possibly change the belt up to maybe this cute cream belt £6 Dorothy Perkins to take away the harshness of the tan belt and tone down the look. Again, I'd suggest wearing a vest/t-shirt with this look with wedges/loafers/sandals with a cute denim jacket. My next favourite midi skirt is: this pretty Fearne Cotton skirt from Very. Its a lovely lemon colour again ticking the box for pastels and will look good with sandals for summer. I love the pleats and the fact that it has an underskirt so no chance of seeing any garish knickers ! It could be worn with a biker jacket to make to skirt slightly more edgy or a simple lace print top tucked in if you want to go for the delicate look of the skirt.


I would recommend this pretty butterfly print top £28 from Dorothy Perkins if i was going to go with the delicate look as it is a few shades lighter than the skirt and the butterflies add some level of interest to the other ways very plain colour pallet.


I was unsure at first with weather or not I liked midi-skirts as they were a length I only associated with granny's. However they have actually grown on my and they're actually quite funky depending on the styling of them. The bright green midi was my way of trying to avoid looking like my Nana as it was such a bright colour and I knew with the right styling I could make it work. Can't wait to wear it in the summer ! It's too chilly here in England at the moment as even whilst writing this the dark clouds are looming over so I doubt this will get a wear until July..however the beauty of these skirts is that I don't have to shave my legs completely woo! It's a win win ! Join me next time when I'll be looking at different jackets as a cover up for when the sun disappears behind the cloud in the summer.

Ohh and as an added extra, I bought this lovely midi skirt for £14 free delivery off ASOS.....


I wear this skirt, with a plain white t-shirt from M&S that cost £6. This skirt looks better with a plain top due to the busy pattern on the skirt. I also wore this with a pair of gladiator sandals and my trusty denim jacket from internationale.